
Experts advise that you back up all of your data and upgrade it on a regular basis. Fortunately, there are a variety of solutions for backing up and securing your data on your iPhone.
Here are the three most effective methods for backing up your iPhone: iCloud, a PC, or an external hard drive.
How to use iCloud to backup up your iPhone
Using iCloud for backup is quite convenient. You can do it remotely via Wi-Fi, and you can even set it up to automatically back up your iPhone, so you never have to worry.
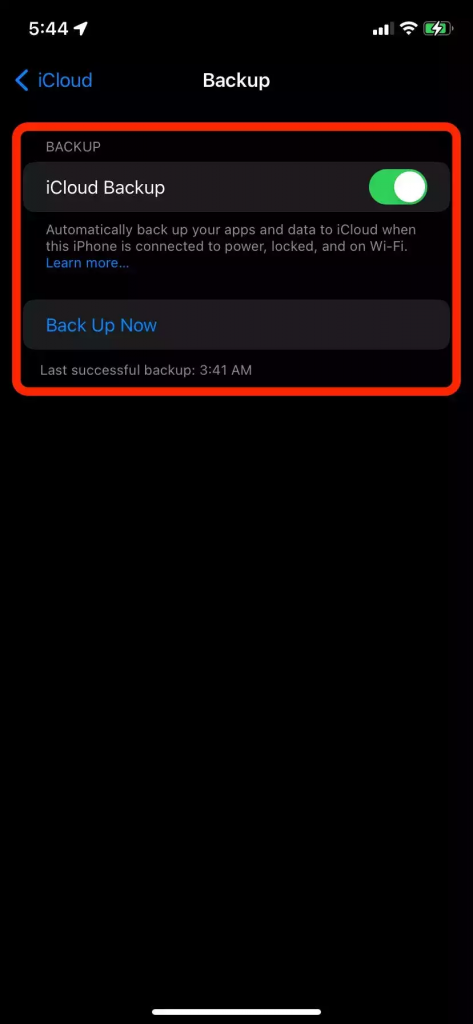
1. Open the Settings app on your iPhone and touch your name at the top of the screen.
2. Tap iCloud and then iCloud backup from the Apple ID menu.

3. Confirm that iCloud backup is enabled. This ensures that your data is backed up even while your iPhone is charging or connected to Wi-Fi but not during active usage. So, before going to bed, plug your phone in, and your files should be backed up on a regular basis.
You may also generate a backup manually by tapping Back Up Now.
What should you do if your iCloud storage runs out?
You only receive 5 GB of free space when you create an Apple ID. If you have many Apple devices backed up to iCloud or even just one reasonably stuffed iPhone, you’ll rapidly run out of space. Given these problems, Apple offers iCloud storage that is cheap and easy to upgrade.
It’s only $0.99 per month for 50 GB, $2.99 for 200 GB, and $9.99 for 2 TB. You may even choose to share the latter two plans with your family, further reducing the cost.
How to make a computer backup of your iPhone
You can save all of your data to your computer if you choose to keep it off the cloud. The computer will hold everything in a single file that you may move and store as you see fit.
If you have a PC, you can accomplish this with iTunes. You’ll need the Finder if you have a Mac. However, the steps are the same in both cases.
1. Plug in your iPhone using its charging cable and open iTunes or Finder on your PC. You’ll be asked whether you want to trust the computer on your iPhone; select Trust and enter your password.
2. Select your iPhone in iTunes or Finder. It will display in iTunes as a little iPhone symbol in the top-left corner, and its name will appear on the left sidebar of Finder.
3. Under Backups, Choose back up your data to the computer
4. Click Back Up Now.
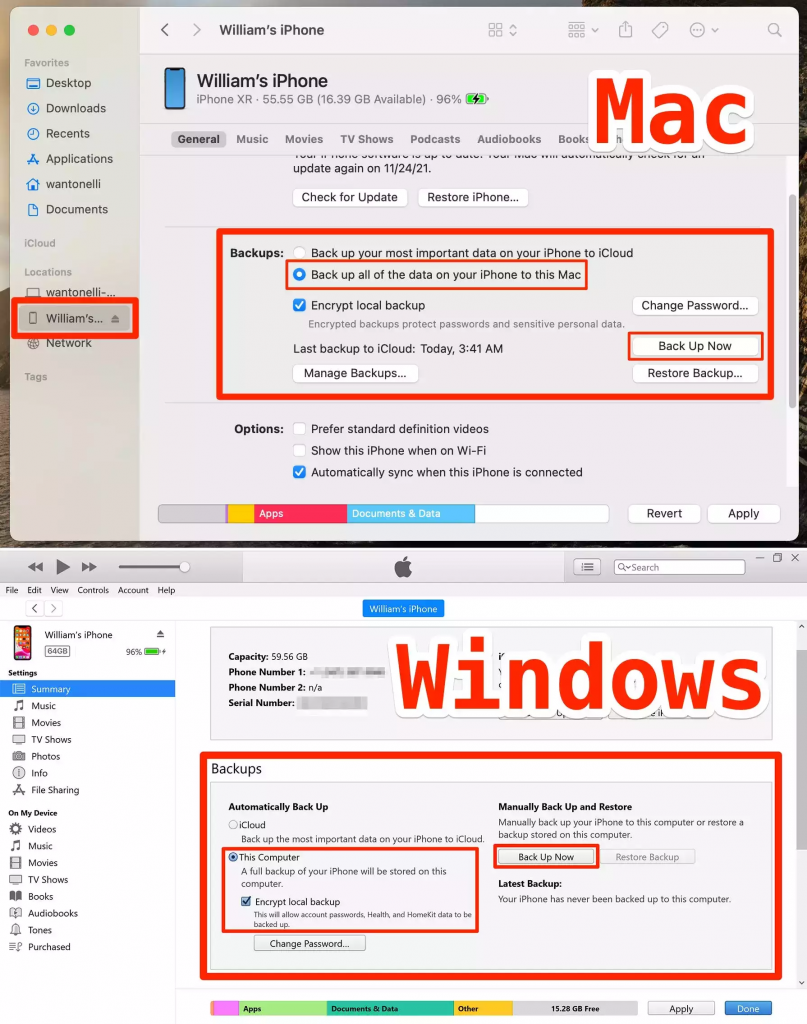
Allow your devices to back up your data for a few minutes. You can now unplug your iPhone after everything has been completed.
Backing up iPhone data on an external drive
The actions outlined above will be sufficient for the vast majority of users.
You’ll have to dig a little further if you want to maintain device backups on an external hard drive or want the option to relocate your backups to a different location on your computer.
On a Mac, locate the backup files as follows:
With the Finder window open, use the Spotlight search button or press Command + Shift + G to copy the following text: /Library/Application Support/MobileSync/Backup/.
This will take you to the folder containing your backups.
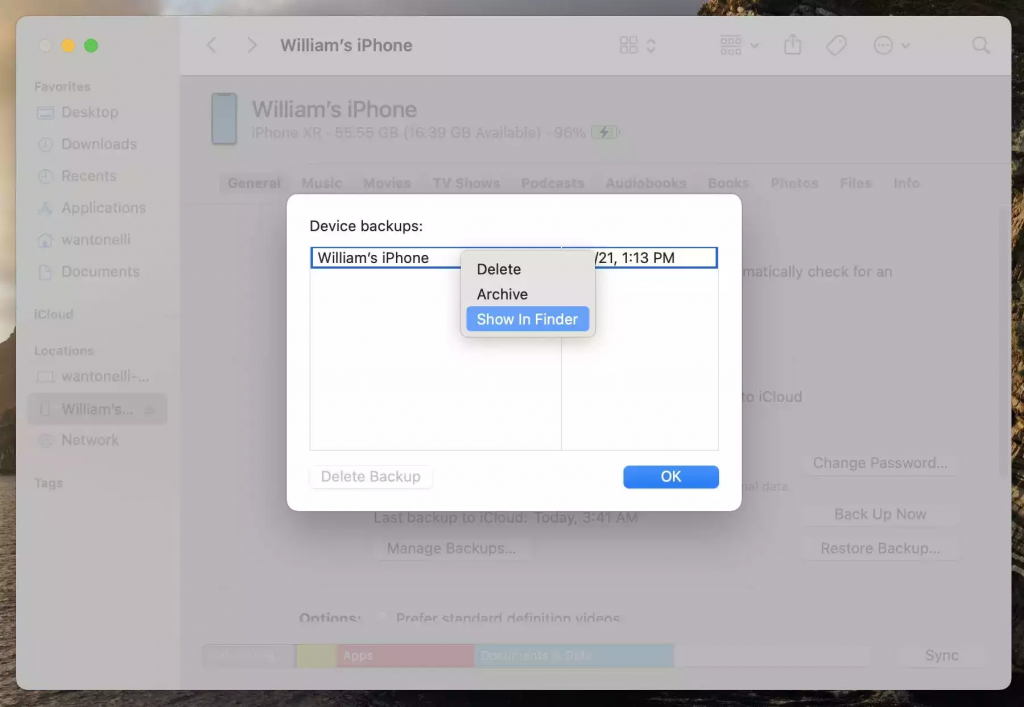
Alternatively, reconnect your iPhone to your Mac, open its menu, and select Manage Backups from the drop-down menu. You’ll be presented with a list of all your backups, which you can find by right-clicking and selecting Show in Finder.
On a Windows computer, perform the following:
For Windows, you’ll follow a similar procedure. Search for \Users\(username)\AppData\Roaming\Apple Computer\MobileSync\Backup\.
Replace with the name of your user profile (username). This will open the folder containing your backups.
Alternatively, open iTunes and select Edit, then Preferences from the menu bar at the top. Click Devices in the pop-up window that appears. You’ll be able to see all of your backups. This option also allows you to remove your backups.
Make copies and move them to an external hard drive.
You can copy your backups to an external drive and erase the ones on your computer hard drive to save storage on your PC. However, having extra copies is always a good idea.
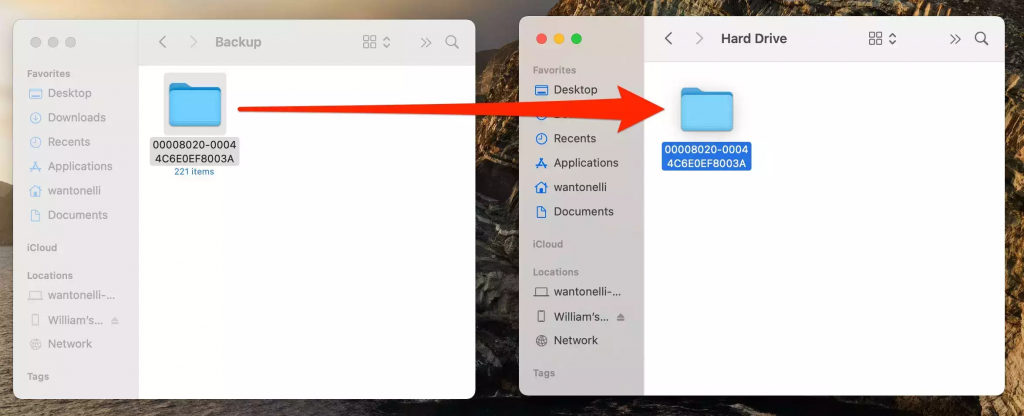
To keep your data safe from corruption, Apple recommends copying the entire folder (or compressing it into a ZIP file) and dragging it to your external hard drive (or a different cloud service like One Drive or Google Drive).
This is author biographical info, that can be used to tell more about you, your iterests, background and experience. You can change it on Admin > Users > Your Profile > Biographical Info page."
About us and this blog
We are a digital marketing company with a focus on helping our customers achieve great results across several key areas.
Request a free quote
We offer professional phone repair service at our multiple outlets or on site. Just give us a call at 9777 7509 for a FREE QUOTE!
Subscribe to our newsletter!


Recent Comments